public class ProgressView extends View {
private float mProgressStrokeWidth = 5;
private float mTextStrokeWidth = 3;
private int mMaxProgress = 100;
private int mCurrentProgress;
private RectF mRectF;
private Paint mPaint;
private Paint mProgressPaint;
private TextPaint mTextPaint;
private String mHint;
private String mTextHint;
private int mStrokeColor;
private int mProgressColor;
public ProgressView(Context context) {
this(context, null);
}
public ProgressView(Context context, AttributeSet attrs) {
this(context, attrs, 0);
}
public ProgressView(Context context, AttributeSet attrs, int defStyleAttr) {
super(context, attrs, defStyleAttr);
init(context, attrs);
}
private void init(Context context, AttributeSet attrs) {
TypedArray ta = context.obtainStyledAttributes(attrs, R.styleable.ProgressView);
try {
mCurrentProgress = ta.getInt(R.styleable.ProgressView_progress, 0);
if (mCurrentProgress > mMaxProgress) {
throw new RuntimeException("progress only define less than 100");
}
mHint = ta.getString(R.styleable.ProgressView_hint);
mTextHint = ta.getString(R.styleable.ProgressView_textHint);
mStrokeColor = ta.getColor(R.styleable.ProgressView_strokeColor, Color.rgb(0xe9, 0xe9, 0xe9));
mProgressColor = ta.getColor(R.styleable.ProgressView_progressColor, getResources().getColor(R.color.colorPrimary));
} finally {
ta.recycle();
}
mPaint = new Paint();
mRectF = new RectF();
}
@Override
protected void onDraw(Canvas canvas) {
int width = this.getWidth();
int height = this.getHeight();
Log.d("ProgressView", "width = " + width + " height = " + height);
if (width != height) {
int min = Math.min(width, height);
width = min;
height = min;
}
mPaint.setAntiAlias(true);
mPaint.setColor(mStrokeColor);
mPaint.setStrokeWidth(mProgressStrokeWidth);
mPaint.setStyle(Style.STROKE);
mRectF.left = mRectF.top = mProgressStrokeWidth / 2;
mRectF.right = width - mProgressStrokeWidth / 2;
mRectF.bottom = height - mProgressStrokeWidth / 2;
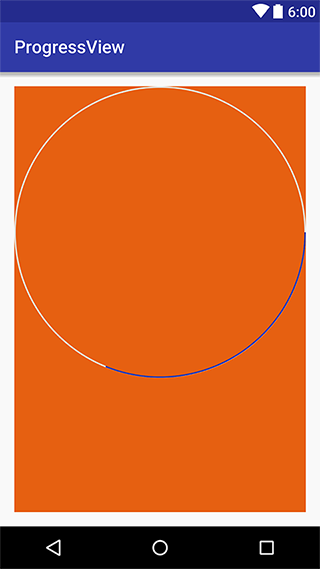
canvas.drawArc(mRectF, 0, 360, false, mPaint);
mPaint.setColor(mProgressColor);
canvas.drawArc(mRectF, 270, ((float) mCurrentProgress / 100) * 360, false, mPaint);
mPaint.setStrokeWidth(mTextStrokeWidth);
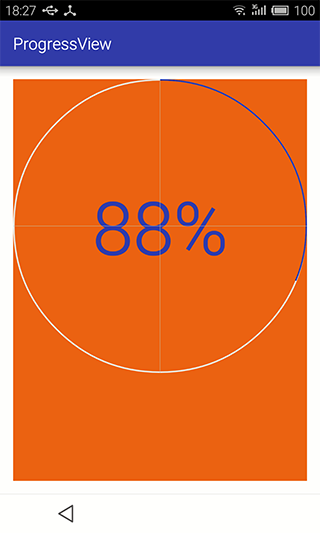
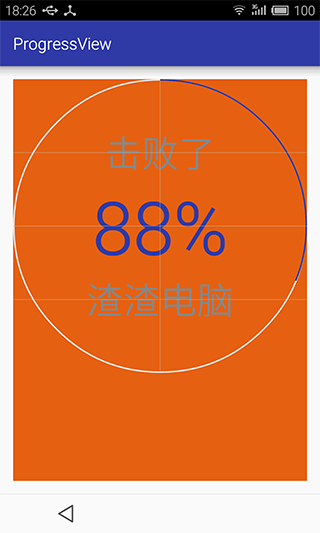
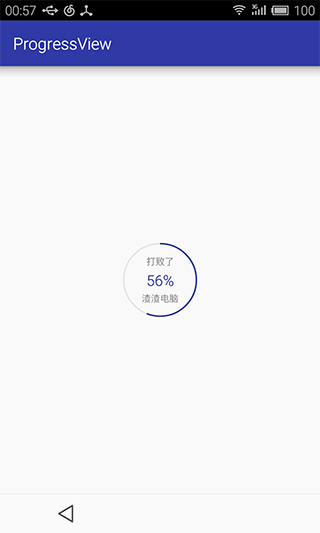
String text = mCurrentProgress + "%";
int textHeight = height / 5;
mPaint.setTextSize(textHeight);
FontMetrics fontMetrics = mPaint.getFontMetrics();
float baseline = (mRectF.bottom + mRectF.top - fontMetrics.bottom - fontMetrics.top) / 2;
int textWidth = (int) mPaint.measureText(text, 0, text.length());
mPaint.setStyle(Style.FILL);
canvas.drawText(text, mRectF.centerX() - textWidth / 2, baseline, mPaint);
if (!TextUtils.isEmpty(mHint)) {
mPaint.setStrokeWidth(mTextStrokeWidth);
textHeight = height / 8;
mPaint.setTextSize(textHeight);
fontMetrics = mPaint.getFontMetrics();
mPaint.setColor(Color.rgb(0x99, 0x99, 0x99));
textWidth = (int) mPaint.measureText(mHint, 0, mHint.length());
mPaint.setStyle(Style.FILL);
baseline = height / 4 - (fontMetrics.bottom + fontMetrics.top) / 2;
canvas.drawText(mHint, width / 2 - textWidth / 2, baseline, mPaint);
}
if (!TextUtils.isEmpty(mTextHint)) {
mPaint.setStrokeWidth(mTextStrokeWidth);
textHeight = height / 8;
mPaint.setTextSize(textHeight);
fontMetrics = mPaint.getFontMetrics();
textWidth = (int) mPaint.measureText(mTextHint, 0, mTextHint.length());
mPaint.setStyle(Style.FILL);
baseline = 3 * height / 4 - (fontMetrics.bottom + fontMetrics.top) / 2;
canvas.drawText(mTextHint, width / 2 - textWidth / 2, baseline, mPaint);
}
if (isInEditMode()) {
mPaint.setStrokeWidth(1);
mPaint.setColor(Color.LTGRAY);
canvas.drawLine(0, width / 2, width, width / 2, mPaint);
canvas.drawLine(0, height / 4, width, height / 4, mPaint);
canvas.drawLine(0, height / 4 * 3, width, height / 4 * 3, mPaint);
canvas.drawLine(width / 2, 0, width / 2, height, mPaint);
}
}
public int getMaxProgress() {
return mMaxProgress;
}
public void setMaxProgress(int maxProgress) {
this.mMaxProgress = maxProgress;
}
public void setProgress(int progress) {
this.mCurrentProgress = progress;
this.invalidate();
}
public void setProgressNotInUIThread(int progress) {
this.mCurrentProgress = progress;
this.postInvalidate();
}
public int getProgress() {
return mCurrentProgress;
}
public String getHint() {
return mHint;
}
public void setHint(String hint) {
mHint = hint;
}
public String getTextHint() {
return mTextHint;
}
public void setTextHint(String textHint) {
mTextHint = textHint;
}
@Override
protected void onMeasure(int widthMeasureSpec, int heightMeasureSpec) {
int desiredWidth = 250;
int desiredHeight = 250;
int widthMode = MeasureSpec.getMode(widthMeasureSpec);
int widthSize = MeasureSpec.getSize(widthMeasureSpec);
int heightMode = MeasureSpec.getMode(heightMeasureSpec);
int heightSize = MeasureSpec.getSize(heightMeasureSpec);
int width;
int height;
if (widthMode == MeasureSpec.EXACTLY) {
width = widthSize;
} else if (widthMode == MeasureSpec.AT_MOST) {
width = Math.min(desiredWidth, widthSize);
} else {
width = desiredWidth;
}
if (heightMode == MeasureSpec.EXACTLY) {
height = heightSize;
} else if (heightMode == MeasureSpec.AT_MOST) {
height = Math.min(desiredHeight, heightSize);
} else {
height = desiredHeight;
}
setMeasuredDimension(width, height);
}
}
|