
Android热修复探究—QQ空间方案
概述:传统的app开发模式下,线上出现bug,必须通过发布新版本,用户手动更新后才能修复线上bug。那么是否存在一种方案可以在不发版的前提下修复线上bug?有!而且不只一种。今天首先来看下腾讯的QQ空间补丁方案
传统的app开发模式下,线上出现bug,必须通过发布新版本,用户手动更新后才能修复线上bug。随着app的业务越来越复杂,代码量爆发式增长,出现bug的机率也随之上升。如果单纯靠发版修复线上bug,其较长的新版覆盖期无疑会对业务造成巨大的伤害,更不要说大型app开发通常涉及多个团队协作,发版排期必须多方协调。
那么是否存在一种方案可以在不发版的前提下修复线上bug?有!而且不只一种,业界各家大厂都针对这一问题拿出了自家的解决方案,较为著名的有腾讯的Tinker和阿里的Andfix以及QQ空间补丁。网上对上述方案有很多介绍性文章,不过大多不全面,中间略过很多细节。笔者在学习的过程中也遇到很多麻烦。所以笔者将通过接下来几篇博客对上述两种方案进行介绍,力求不放过每一个细节。首先来看下QQ空间补丁方案。
Dex分包机制
大家都知道,我们开发的代码在被编译成class文件后会被打包成一个dex文件。但是dex文件有一个限制,由于方法id是一个short类型,所以导致了一个dex文件最多只能存放65536个方法。随着现今App的开发日益复杂,导致方法数早已超过了这个上限。为了解决这个问题,Google提出了multidex方案,即一个apk文件可以包含多个dex文件。
不过值得注意的是,除了第一个dex文件以外,其他的dex文件都是以资源的形式被加载的,换句话说就是在Application.onCreate()方法中被注入到系统的ClassLoader中的。这也就为热修复提供了一种可能:将修复后的代码达成补丁包,然后发送到客户端,客户端在启动的时候到指定路径下加载对应dex文件即可。
根据Android虚拟机的类加载机制,同一个类只会被加载一次,所以要让修复后的类替换原有的类就必须让补丁包的类被优先加载。接下来看下Android虚拟机的类加载机制。
类加载机制
Android的类加载机制和jvm加载机制类似,都是通过ClassLoader来完成,只是具体的类不同而已。
Android系统通过PathClassLoader来加载系统类和主dex中的类。/**
* Provides a simple {@link ClassLoader} implementation that operates on a list
* of files and directories in the local file system, but does not attempt to
* load classes from the network. Android uses this class for its system class
* loader and for its application class loader(s).
*/
而DexClassLoader则用于加载其他dex文件中的类。/**
* A class loader that loads classes from {@code .jar} and {@code .apk} files
* containing a {@code classes.dex} entry. This can be used to execute code not
* installed as part of an application.
*
* <p>This class loader requires an application-private, writable directory to
* cache optimized classes. Use {@code Context.getDir(String, int)} to create
* such a directory: <pre> {@code
* File dexOutputDir = context.getDir("dex", 0);
* }</pre>
*
* <p><strong>Do not cache optimized classes on external storage.</strong>
* External storage does not provide access controls necessary to protect your
* application from code injection attacks.
*/
上述两个类都是继承自BaseDexClassLoader,查看源码得知具体的加载方法是findClass:/**
* Base class for common functionality between various dex-based
* {@link ClassLoader} implementations.
*/
public class BaseDexClassLoader extends ClassLoader {
private final DexPathList pathList;
/**
* Constructs an instance.
*
* @param dexPath the list of jar/apk files containing classes and
* resources, delimited by {@code File.pathSeparator}, which
* defaults to {@code ":"} on Android
* @param optimizedDirectory directory where optimized dex files
* should be written; may be {@code null}
* @param libraryPath the list of directories containing native
* libraries, delimited by {@code File.pathSeparator}; may be
* {@code null}
* @param parent the parent class loader
*/
public BaseDexClassLoader(String dexPath, File optimizedDirectory,
String libraryPath, ClassLoader parent) {
super(parent);
this.pathList = new DexPathList(this, dexPath, libraryPath, optimizedDirectory);
}
protected Class<?> findClass(String name) throws ClassNotFoundException {
List<Throwable> suppressedExceptions = new ArrayList<Throwable>();
Class c = pathList.findClass(name, suppressedExceptions);
if (c == null) {
ClassNotFoundException cnfe = new ClassNotFoundException("Didn't find class \"" + name + "\" on path: " + pathList);
for (Throwable t : suppressedExceptions) {
cnfe.addSuppressed(t);
}
throw cnfe;
}
return c;
}
...省略代码
}
从代码中可以看到加载类的工作转移到了pathList中,pathList是一个DexPathList类型,从变量名和类型名就可以看出这是一个维护Dex的容器:
/*package*/ final class DexPathList { |
DexPathList的findClass也很简单,dexElements是维护dex文件的数组,每一个item对应一个dex文件。DexPathList遍历dexElements,从每一个dex文件中查找目标类,在找到后即返回并停止遍历。所以要想达到热修复的目的就必须让补丁dex在dexElements中的位置先于原有dex:
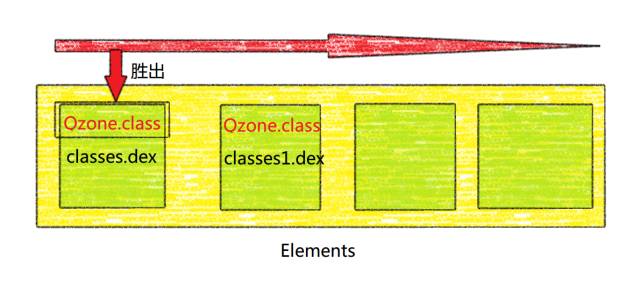
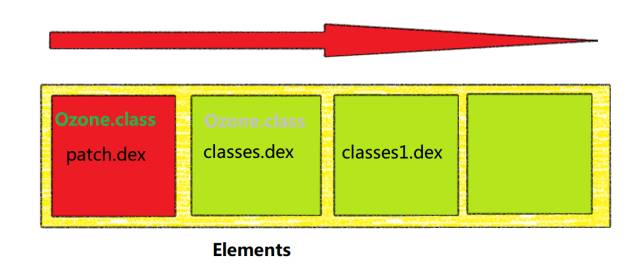
基本上以上的部分就是QQ空间动态修复方案的基本思路。下面将以一个简单的例子讲述一下QQ空间补丁热修复的过程。
创建补丁
1.创建简单类public class Hello {
public String say() {
return "hello world";
}
}
2.Activity也很简单,实例化Hello并且调用方法public class MainActivity extends AppCompatActivity implements OnClickListener {
private static final String TAG = MainActivity.class.getSimpleName();
protected void onCreate(Bundle savedInstanceState) {
super.onCreate(savedInstanceState);
Log.d(TAG, "getClassLoader():" + getClassLoader());
setContentView(R.layout.activity_main);
Button button = (Button) findViewById(R.id.button);
button.setOnClickListener(this);
}
public void onClick(View v) {
Toast.makeText(this, String.valueOf(new Hello().say()), Toast.LENGTH_SHORT).show();
}
}
3.创建补丁包
首先修改要修复的类,我们在返回的字符串后加了三个感叹号。public class Hello {
public String say() {
return "hello world!!!";
}
}
4.重新编译项目,在app/build/intermediates/classes/debug/com/jinlin/base/hotfix/目录下找到Hello.class文件,将其拷出来,准备打包。注意要放置在于Hello包名相同的路径下com/jinlin/base/hotfix/。然后使用命令将其打成jar包:
jar -cvf patch.jar com |
再将对应的jar包打成dex包:dx --dex --output=patch_dex.jar patch.jar
dx是将jar包打成dex包的工具,安装在$sdk_home$/build-tools/version(如23.0.1)/dx。生成的patch_dex.jar就是补丁包。接下来将其放到SDCard中,之后应用从sdCard上加载该补丁包。注意:这里需要添加读取内存卡的权限adb push patch_dex.jar /mnt/sdcard/
加载补丁
加载补丁的思路如下:
在Application的onCreate()方法中获取应用本身的BaseDexClassLoader,然后通过反射得到对应的dexElements
创建一个新的DexClassLoader实例,然后加载SDCard上的补丁包,通过同样的反射方法得到对应的dexElements
将两个dexElements合并,再利用反射将合并后的dexElements赋值给应用本身的BaseDexClassLoader
接下来看下具体代码:public class HotFixApplication extends Application {
private static final String TAG = HotFixApplication.class.getSimpleName();
public void onCreate() {
super.onCreate();
// 获取补丁,如果存在就执行注入操作
String dexPath = Environment.getExternalStorageDirectory().getAbsolutePath().concat("/patch_dex.jar");
File file = new File(dexPath);
if (file.exists()) {
inject(dexPath);
} else {
Log.e(TAG, dexPath + "不存在");
}
}
/**
* 要注入的dex的路径
*
* @param path
*/
private void inject(String path) {
try {
// 获取classes的dexElements
Class<?> cl = Class.forName("dalvik.system.BaseDexClassLoader");
Object pathList = getField(cl, "pathList", getClassLoader());
Object baseElements = getField(pathList.getClass(), "dexElements", pathList);
// 获取patch_dex的dexElements(需要先加载dex)
String dexopt = getDir("dexopt", 0).getAbsolutePath();
DexClassLoader dexClassLoader = new DexClassLoader(path, dexopt, dexopt, getClassLoader());
Object obj = getField(cl, "pathList", dexClassLoader);
Object dexElements = getField(obj.getClass(), "dexElements", obj);
// 合并两个Elements
Object combineElements = combineArray(dexElements, baseElements);
// 将合并后的Element数组重新赋值给app的classLoader
setField(pathList.getClass(), "dexElements", pathList, combineElements);
//======== 以下是测试是否成功注入 =================
Object object = getField(pathList.getClass(), "dexElements", pathList);
int length = Array.getLength(object);
Log.e(TAG, "length = " + length);
} catch (Exception e) {
e.printStackTrace();
}
}
/**
* 通过反射获取对象的属性值
*/
private Object getField(Class<?> cl, String fieldName, Object object) throws NoSuchFieldException, IllegalAccessException {
Field field = cl.getDeclaredField(fieldName);
field.setAccessible(true);
return field.get(object);
}
/**
* 通过反射设置对象的属性值
*/
private void setField(Class<?> cl, String fieldName, Object object, Object value) throws NoSuchFieldException, IllegalAccessException {
Field field = cl.getDeclaredField(fieldName);
field.setAccessible(true);
field.set(object, value);
}
/**
* 通过反射合并两个数组
*/
private Object combineArray(Object firstArr, Object secondArr) {
int firstLength = Array.getLength(firstArr);
int secondLength = Array.getLength(secondArr);
int length = firstLength + secondLength;
Class<?> componentType = firstArr.getClass().getComponentType();
Object newArr = Array.newInstance(componentType, length);
for (int i = 0; i < length; i++) {
if (i < firstLength) {
Array.set(newArr, i, Array.get(firstArr, i));
} else {
Array.set(newArr, i, Array.get(secondArr, i - firstLength));
}
}
return newArr;
}
}
核心代码就这么多,运行一下程序看看效果。程序依然Crash了。抛出的异常如下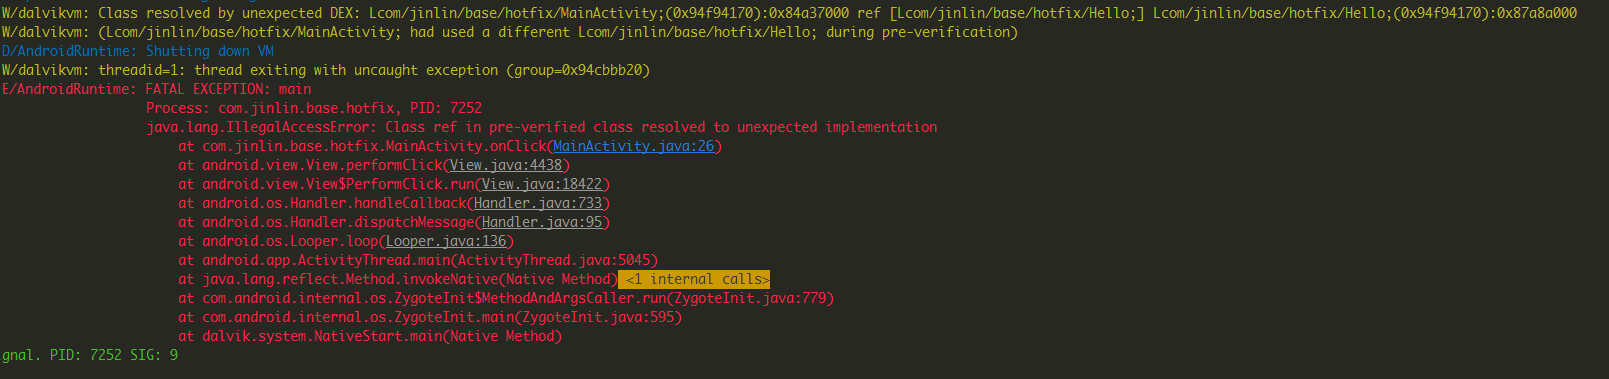
原因是类预校验问题引起的,具体请看安卓App热补丁动态修复技术介绍在apk安装的时候系统会将dex文件优化成odex文件,在优化的过程中会涉及一个预校验的过程。如果一个类的static方法,private方法,override方法以及构造函数中引用了其他类,并且这些类都属于同一个dex文件,此时该类就会被打上CLASS_ISPREVERIFIED。如果在运行时被打上CLASS_ISPREVERIFIED的类引用了其他dex的类,就会报错Class ref in pre-verified class resolved to unexpected implementation所以MainActivity的onClick()方法中引用另一个dex的类就会出现上文中的问题。正常的分包方案会保证相关类被打入同一个dex文件,想要使得patch补丁包可以被正常加载,就必须保证类不会被打上CLASS_ISPREVERIFIED标记。而要实现这个目的就必须要在分完包后的class中植入对其他dex文件中类的引用。
字节码注入
要在已经编译完成后的类中植入对其他类的引用,就需要操作字节码,惯用的方案是插桩。常见的工具有javaassist,ASM等。其实QQ空间补丁方案的关键就在于字节码的注入而不是dex的注入。相比之下ASM提供一系列字节码指令,效率更高但是要求使用者对字节码操作有一定了解。而javaassist虽然效率差一些但是使用门槛较低,我们选择使用javaassist。关于javaassist可以网上搜索一些资料了解一下,这里不做详细描述。
用 Javassist 进行类字节码插桩
正常App开发过程中,编译,打包过程都是Android Studio自动完成。如无特殊需求无需人为干预,但是要实现插桩就必须在Android Studio的自动化打包流程中加入插桩的过程。
- Gradle,Task,Transform,Plugin
Android Studio采用Gradle作为构建工具,所有有必要了解一下Gradle构建的基本概念和流程。如果不熟悉可以参考一下下列文章:
Gradle学习系列之一——Gradle快速入门
深入理解Android之Gradle
Gradle的构建工程实质上是通过一系列的Task完成的,所以在构建apk的过程中就存在一个打包dex的任务。Gradle 1.5以上版本提供了一个新的API:Transform,官方文档对于Transform的描述是:
The goal of this API is to simplify injecting custom class manipulations without having to deal with tasks, and to offer more flexibility on what is manipulated. The internal code processing (jacoco, progard, multi-dex) have all moved to this new mechanism already in 1.5.0-beta1.
- The Dex class is gone. You cannot access it anymore through the variant API (the getter is still there for now but will throw an exception)
- Transform can only be registered globally which applies them to all the variants. We’ll improve this shortly.
- There’s no way to control ordering of the transforms.
Transform任务一经注册就会被插入到任务执行队列中,并且其恰好在dex打包task之前。所以要想实现插桩就必须创建一个Transform类的Task。
1.1 Task
Gradle的执行脚本就是由一系列的Task完成的。Task有一个重要的概念:input的output。每一个task需要有输入input,然后对input进行处理完成后在输出output。
1.2 Plugin
Gradle的另外一个重要概念就是Plugin。整个Gradle的构建体系都是有一个一个的plugin构成的,实际Gradle只是一个框架,提供了基本task和指定标准。而具体每一个task的执行逻辑都定义在一个个的plugin中。详细的概念可以参考:Writing Custom Plugins
在Android开发中我们经常使用到的plugin有:”com.android.application”,”com.android.library”,”java”等等。每一个Plugin包含了一系列的task,所以执行gradle脚本的过程也就是执行目标脚本所apply的plugin所包含的task。
1.3 创建一个包含Transform任务的Plugin
- 新建一个module,选择library module,module名字必须叫BuildSrc
- 删除module下的所有文件,除了build.gradle,清空build.gradle中的内容
- 然后新建以下目录 src-main-groovy
- 修改build.gradle如下,同步
apply plugin: 'groovy' |
- 像普通module一样新建package和类,不过这里的类是以groovy结尾,新建类的时候选择file,并且以.groovy作为后缀
- 自定义Plugin:
PreDexTransform.groovy
package com.hotfix.plugin |
Inject.groovypackage com.hotfix.plugin
import javassist.ClassPool
import javassist.CtClass
import javassist.NotFoundException
import org.apache.commons.io.FileUtils
public class Inject {
private static ClassPool sPool = ClassPool.getDefault()
/**
* 添加classPath到ClassPool
* @param libPath
*/
public static void appendClassPath(String libPath) throws NotFoundException {
sPool.appendClassPath(libPath)
}
/**
* 遍历该目录下的所有class,对所有class进行代码注入。
* 其中以下class是不需要注入代码的:
* --- 1. R文件相关
* --- 2. 配置文件相关(BuildConfig)
* --- 3. Application
* @param path 目录的路径
*/
public static void injectDir(String path) {
sPool.appendClassPath(path)
File dir = new File(path)
if (dir.isDirectory()) {
dir.eachFileRecurse { File file ->
String filePath = file.absolutePath
if (filePath.endsWith(".class")
&& !filePath.contains('R$')
&& !filePath.contains('R.class')
&& !filePath.contains("BuildConfig.class")
// 这里是application的名字,可自行配置
&& !filePath.contains("HotFixApplication.class")) {
// 应用程序包名,可自行配置
int index = filePath.indexOf("com/jinlin/base/hotfix")
if (index != -1) {
int end = filePath.length() - 6 // .class = 6
String className = filePath.substring(index, end).replace('\\', '.').replace('/', '.')
injectClass(className, path)
}
}
}
}
}
/**
* 这里需要将jar包先解压,注入代码后再重新生成jar包
* @path jar包的绝对路径
*/
public static void injectJar(String path) {
if (path.endsWith(".jar")) {
File jarFile = new File(path)
// jar包解压后的保存路径
String jarZipDir = jarFile.getParent() + "/" + jarFile.getName().replace('.jar', '')
// 解压jar包, 返回jar包中所有class的完整类名的集合(带.class后缀)
List classNameList = JarZipUtils.unzipJar(path, jarZipDir)
// 删除原来的jar包
jarFile.delete()
// 注入代码
sPool.appendClassPath(jarZipDir)
for (String className : classNameList) {
if (className.endsWith(".class")
&& !className.contains('R$')
&& !className.contains('R.class')
&& !className.contains("BuildConfig.class")) {
className = className.substring(0, className.length() - 6)
injectClass(className, jarZipDir)
}
}
// 从新打包jar
JarZipUtils.zipJar(jarZipDir, path)
// 删除目录
FileUtils.deleteDirectory(new File(jarZipDir))
}
}
private static void injectClass(String className, String path) {
CtClass c = sPool.getCtClass(className)
if (c.isFrozen()) {
c.defrost()
}
def constructor = c.getConstructors()[0];
constructor.insertAfter("System.out.println(com.jinlin.base.hack.AntilazyLoad.class);")
c.writeFile(path)
}
}
JarZipUtil.groovyimport java.util.jar.JarEntry
import java.util.jar.JarFile
import java.util.jar.JarOutputStream
import java.util.zip.ZipEntry
public class JarZipUtils {
/**
* 将该jar包解压到指定目录
* @param jarPath jar包的绝对路径
* @param destDirPath jar包解压后的保存路径
* @return 返回该jar包中包含的所有class的完整类名类名集合,其中一条数据如:com.aitski.hotpatch.Xxxx.class
*/
public static List unzipJar(String jarPath, String destDirPath) {
List list = new ArrayList()
if (jarPath.endsWith('.jar')) {
JarFile jarFile = new JarFile(jarPath)
Enumeration<JarEntry> jarEntrys = jarFile.entries()
while (jarEntrys.hasMoreElements()) {
JarEntry jarEntry = jarEntrys.nextElement()
if (jarEntry.directory) {
continue
}
String entryName = jarEntry.getName()
if (entryName.endsWith('.class')) {
String className = entryName.replace('\\', '.').replace('/', '.')
list.add(className)
}
String outFileName = destDirPath + "/" + entryName
File outFile = new File(outFileName)
outFile.getParentFile().mkdirs()
InputStream inputStream = jarFile.getInputStream(jarEntry)
FileOutputStream fileOutputStream = new FileOutputStream(outFile)
fileOutputStream << inputStream
fileOutputStream.close()
inputStream.close()
}
jarFile.close()
}
return list
}
/**
* 重新打包jar
* @param packagePath 将这个目录下的所有文件打包成jar
* @param destPath 打包好的jar包的绝对路径
*/
public static void zipJar(String packagePath, String destPath) {
File file = new File(packagePath)
JarOutputStream outputStream = new JarOutputStream(new FileOutputStream(destPath))
file.eachFileRecurse { File f ->
String entryName = f.getAbsolutePath().substring(packagePath.length() + 1)
outputStream.putNextEntry(new ZipEntry(entryName))
if (!f.directory) {
InputStream inputStream = new FileInputStream(f)
outputStream << inputStream
inputStream.close()
}
}
outputStream.close()
}
}
在app module下build.gradle文件中添加新插件:apply plugin: com.hotpatch.plugin.Register
创建hack.jar
创建一个单独的module,命名为com.hotpatch.plugin.AntilazyLoad
package com.jinlin.base.hack; |
使用上一篇博客介绍的方法打包hack.jar。然后将hack.jar复制到app module下的assets目录中。另外注意:app module不能依赖hack module。之所以要创建一个hack module,同时人为地在dex打包过程中插入对其他hack.jar中类的依赖,就是要让apk文件在安装的时候不被打上CLASS_ISPREVERIFIED标记。
另外由于hack.jar位于assets中,所以必须要在加载patch_dex之前加载hack.jar。另外由于加载其他路径的dex文件都是在Application.onCreate()方法中执行的,此时还没有加载hack.jar,所以这就是为什么在上一章节插桩的时候不能在Application中插桩的原因。
插桩的过程介绍完了,整个热修复的过程也就差不多了,读者可以参考完整的代码进行demo试用:Hotpatch Demo